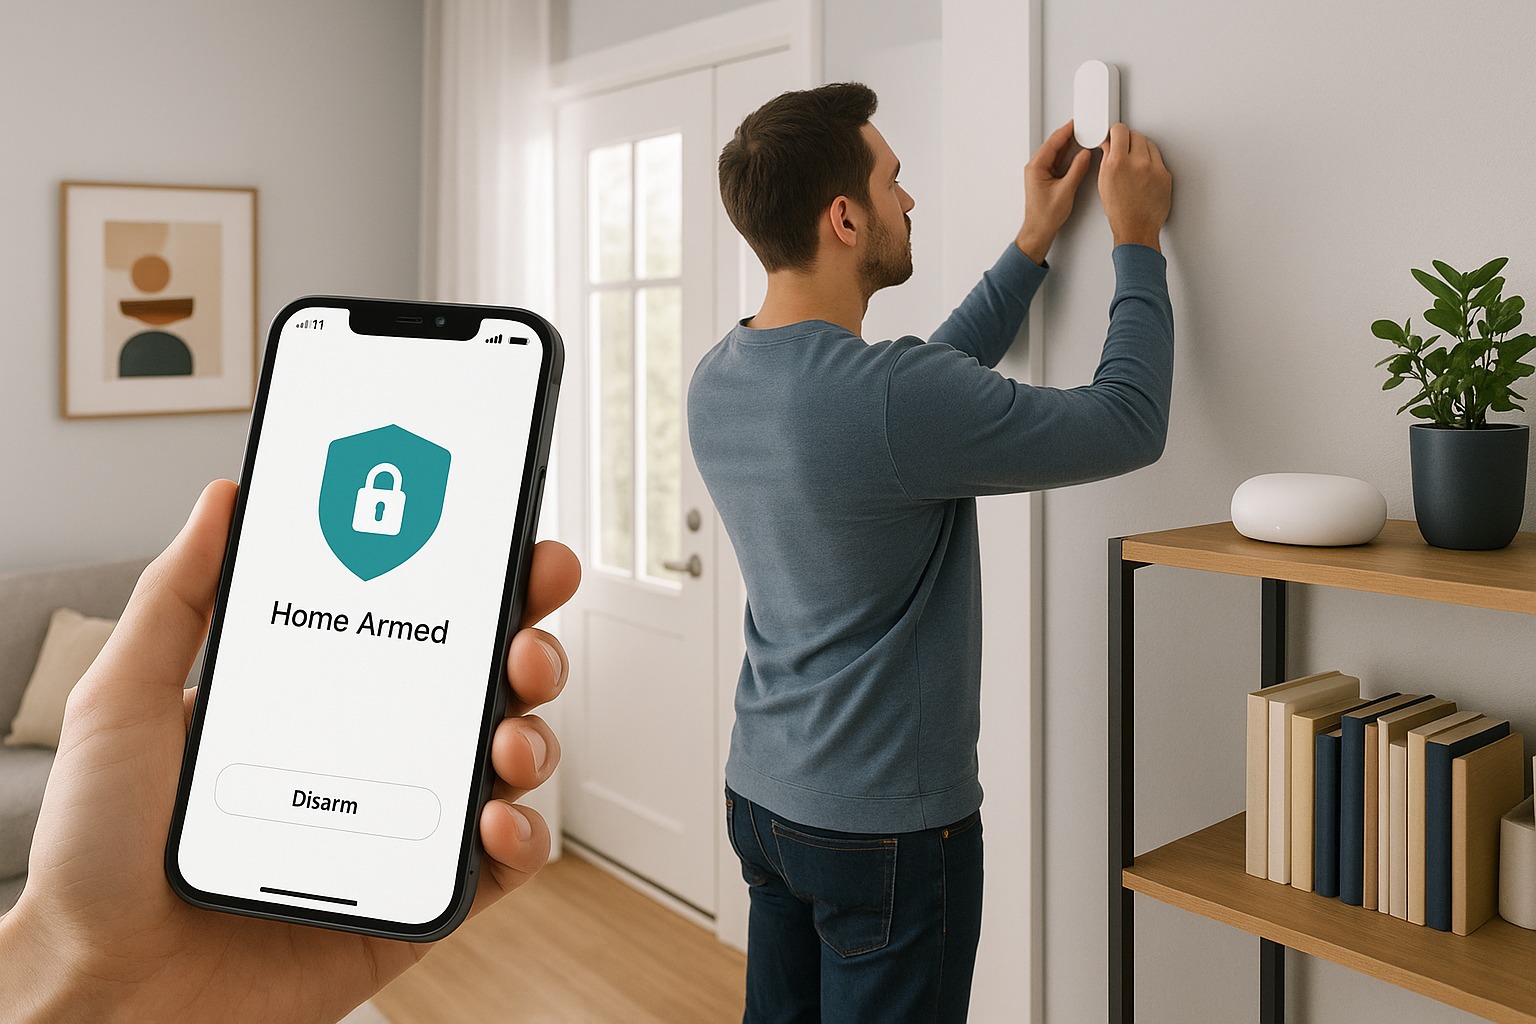
Installing your own smart alarm system is no longer just for tech pros or electricians — today’s smart home security kits are built with the everyday DIYer in mind. Whether you’re looking to save money on professional installation or simply want the flexibility to customize your setup, doing it yourself is easier than ever.
With wireless alarm systems, app-based controls, and step-by-step guidance from manufacturers, homeowners and renters alike can enjoy peace of mind with minimal effort. This guide walks you through everything you need to know — from choosing the right smart alarm kit to mounting sensors and connecting your mobile app.
If you’ve ever asked yourself, “Can I set up my own home security system?” — the answer is a confident yes. Let’s dive in and get your home protected in no time.
To install your own smart alarm system, start by selecting a DIY-friendly kit with sensors, a hub, and a mobile app. Place entry sensors on doors and windows, mount motion detectors, and connect the hub to Wi-Fi. Use the app to configure settings and run tests. Most systems are wireless and require minimal tools for setup.
Read more about:
- Smart home for beginners
- What is a smart home and how does it work
- Setting up your first smart device
🔒 Why Choose a DIY Smart Alarm System?
There are many reasons homeowners today are ditching professional installers and choosing to install smart alarm systems themselves. For starters, it’s a cost-effective option — you save hundreds of dollars on labor by setting it up on your own.
But it’s not just about saving money. A DIY smart home security system gives you full control over how your system is set up and where each sensor goes. Want to add extra protection to your shed or garage? No problem. Need to move sensors when you rearrange your home? It’s easy when you’re in charge.
Another big win is flexibility. Many self-install systems are wireless and modular, meaning you can start small and expand as needed. Whether you live in a rented apartment or a multi-level home, these systems adapt to your lifestyle. Most even integrate with smart assistants like Alexa and Google Home, giving you voice control and automation options.
So if you’re looking for freedom, savings, and smarter protection, going the DIY route is a great move.
🧰 What You Need Before You Start
Before you dive into the installation process, it’s important to gather the right gear and choose a system that matches your home’s needs. A little preparation goes a long way in making your DIY smart alarm setup smooth and stress-free.
📦 Choose the Right Smart Alarm Kit
Not all smart alarm systems are created equal. Some offer just the basics — like a control hub and a few sensors — while others include cameras, smoke detectors, and advanced motion sensors. When choosing a DIY alarm kit, look for these essential features:
- Base Station or Smart Hub – The brain of the system that connects all your devices
- Door/Window Sensors – To detect entry points
- Motion Detectors – For interior movement monitoring
- Mobile App Control – So you can arm/disarm your system from anywhere
- Siren or Alarm – A loud alert to scare off intruders
Popular brands like Ring, SimpliSafe, Wyze, and Abode offer beginner-friendly systems with everything you need to get started. Make sure your kit is compatible with your smartphone (iOS or Android) and your preferred smart home platform like Alexa or Google Assistant.
🛠️ Tools and Supplies Checklist
Most smart alarm systems are designed for easy installation with minimal tools, especially since many use adhesive mounts instead of screws. Here’s what you’ll typically need:
- Smartphone or tablet with internet access
- Stable Wi-Fi connection (2.4 GHz is standard)
- Mounting tools (adhesive strips, screws, screwdriver, or drill if required)
- Batteries (usually included, but double-check)
- Ladder or step stool for installing sensors in higher spots
- The companion mobile app downloaded and ready
💡Pro tip: Unbox everything ahead of time and read the quick-start guide that comes with your system. That way, you can move from one step to the next without delays.
🛠️ Step-by-Step Guide to Installing Your Smart Alarm System
You’ve got your smart alarm kit, your phone’s charged, and you’re ready to go. Don’t worry — setting it all up is easier than you might think. Most smart alarm systems are designed for quick, DIY installation with no special tools or technical background needed. Just follow these simple steps and you’ll have your home secured in no time.
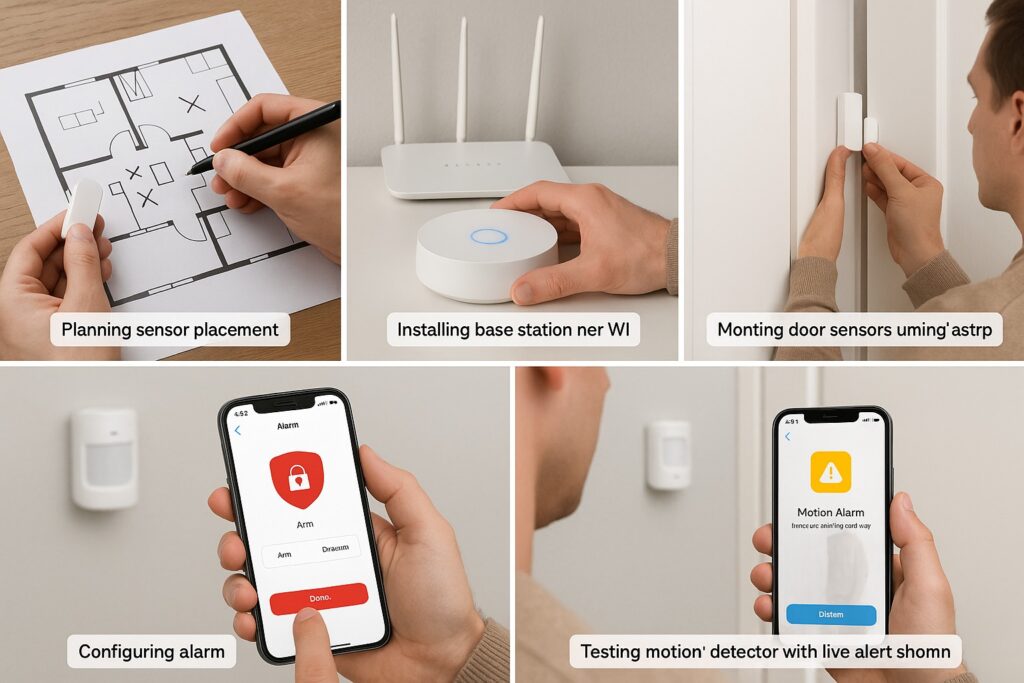
📍 Step 1: Plan Sensor Placement
Before sticking anything to your walls, take a few minutes to map out where your entry sensors and motion detectors should go. Start with doors, windows, and other potential entry points — these are your first priority.
When placing motion sensors, think in terms of “line of sight.” This means choosing spots where the sensor has a clear, unobstructed view of the room. Avoid placing them behind furniture, heavy curtains, or in direct sunlight. Hallways and open spaces work best. And if you have pets, make sure to install motion detectors above their movement range or use pet-friendly models.
🧠 Step 2: Install the Base Station or Hub
The smart hub or base station is the brain of your wireless alarm system. It connects all your sensors and sends real-time alerts to your phone. You’ll want to place it in a central location in your home, preferably near your Wi-Fi router for a strong signal.
Plug in the hub and follow the manufacturer’s instructions to get it online. Most systems will guide you through pairing the hub with the companion mobile app, usually by scanning a QR code or entering a device code.
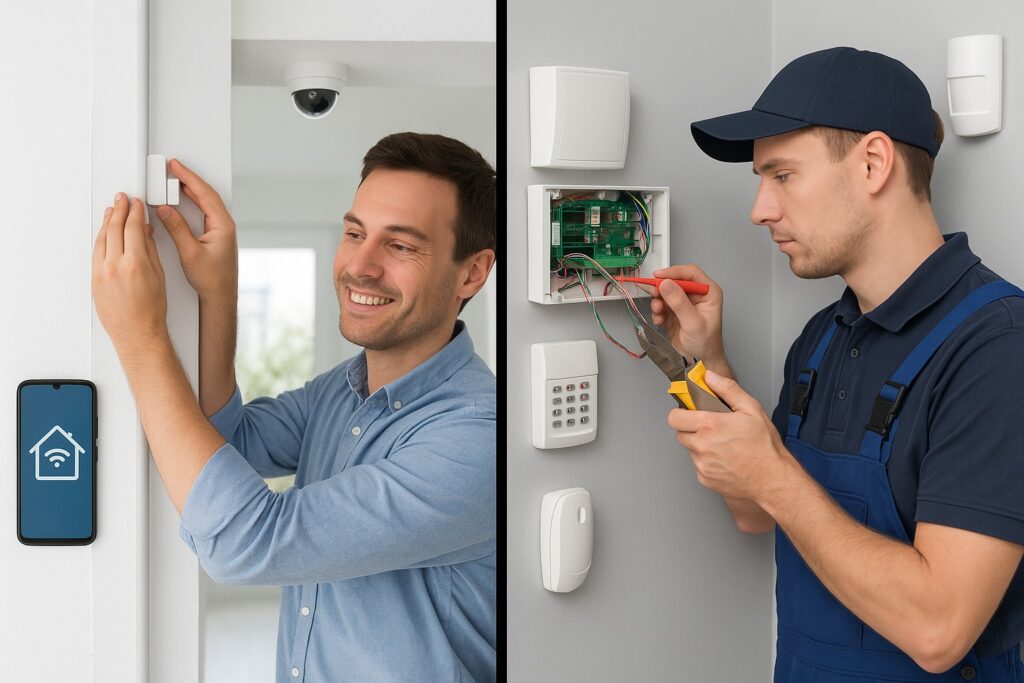
🚪 Step 3: Mount Entry Sensors and Motion Detectors
Now it’s time to install the actual devices. For entry sensors, mount one part on the door or window and the other on the frame — they need to be aligned closely (within half an inch) so they work properly when the door opens.
For motion detectors, install them around 6 to 8 feet high, ideally in corners facing large areas. If your system includes glass break sensors or extra sirens, now’s the time to place those as well.
Most smart alarms use peel-and-stick adhesive backing, but you can use screws for a more permanent setup if needed.
📱 Step 4: Connect to the Mobile App and Configure Settings
With your devices mounted, open the mobile app and start adding each sensor. You’ll usually be prompted to name them (like “Front Door” or “Living Room Motion Sensor”) and test connectivity.
Here’s what to set up in the app:
- Security modes (Home, Away, Disarmed)
- Notification preferences (push alerts, email, or SMS)
- Sensor sensitivity levels
- Schedules or automation routines
- Integration with Alexa, Google Assistant, or Apple HomeKit if supported
This is where your smart alarm truly becomes smart — giving you remote access and total control from your phone.
✅ Step 5: Test the Entire System
Don’t skip this step! A proper system test helps ensure that everything is working exactly how it should. Open each door and window, walk past motion detectors, and check if you get alerts on your app.
Test the siren too — it should activate when a breach is detected. This is also a good time to check for weak Wi-Fi signals or disconnected devices. Run through a full alarm scenario so you’re confident everything’s set up right.
🧪 Pro Tip: Run monthly tests and check for firmware updates to keep your system running smoothly.
⚙️ Tips to Optimize Your DIY Smart Alarm Setup
Now that your smart alarm system is up and running, it’s time to take things to the next level. With just a few smart tweaks, you can boost performance, reduce false alarms, and make your system even more reliable and responsive.
Here’s how to get the most out of your DIY smart security setup.
🚨 Prevent False Alarms with Smart Sensor Placement
One of the most common frustrations for homeowners is dealing with false alerts. These can be triggered by things like pets, air vents, direct sunlight, or even curtains blowing in the breeze.
To avoid unnecessary notifications:
- Install pet-friendly motion detectors or place sensors above pet height
- Avoid placing sensors near heat sources like radiators or direct sunlight
- Make sure door and window sensors are aligned properly and secured tightly
- Keep sensors clean and free from dust or cobwebs
📌 Pro Tip: Adjust motion sensitivity in your app to match the room’s activity level. Lower it for small bedrooms, higher for larger open spaces.
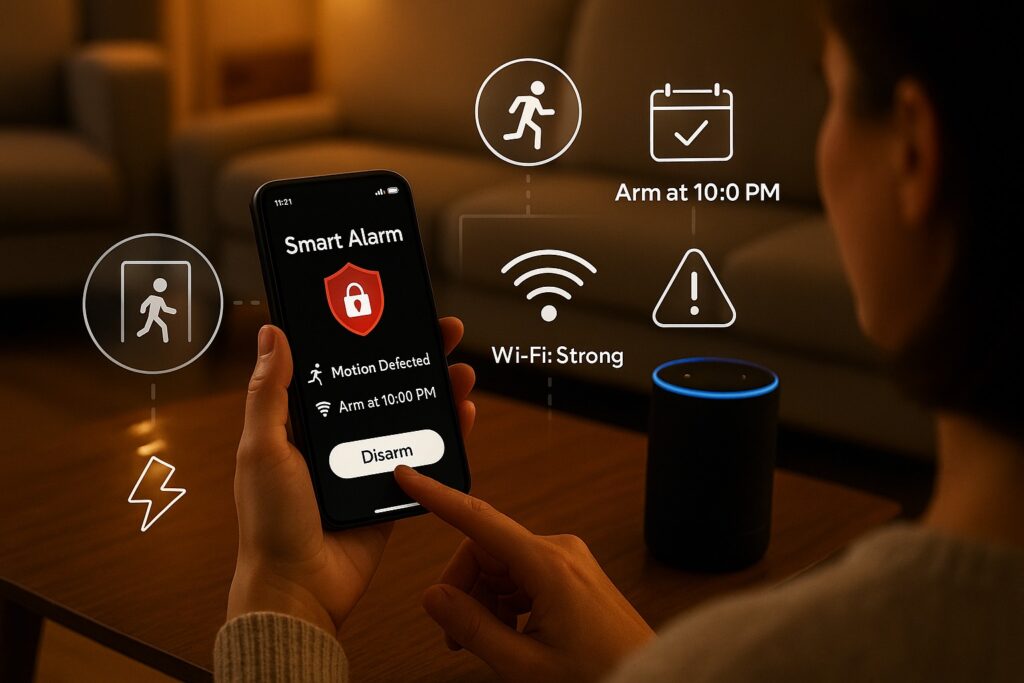
🗣️ Use Smart Assistant Integration and Automations
Take advantage of smart home platforms like Amazon Alexa, Google Assistant, or Apple HomeKit to add voice control and automations.
You can say things like:
“Alexa, arm my home alarm.”
“Hey Google, what’s the status of my security system?”
You can also create smart routines such as:
- Automatically arming your system every night at 10 PM
- Disarming it when you arrive home via geofencing
- Getting alerts if the kids open the front door during school hours
These features make your alarm not just smart — but intelligent and personalized.
📶 Strengthen Wi-Fi and Power Backup
Your alarm system is only as good as its connection. A weak Wi-Fi signal can cause sensors to disconnect or alerts to be delayed.
To fix that:
- Place your smart hub close to the Wi-Fi router
- Use a mesh Wi-Fi system or range extender if you have a large home
- Avoid placing hubs behind furniture or inside cabinets
Also, consider these backup options:
- Battery backup for your hub (usually lasts 24–48 hours)
- Cellular backup (offered with some paid plans) to stay connected even if Wi-Fi goes down
This ensures your system keeps protecting your home even during power outages or internet blackouts.
Related:
- How to integrate Alexa with your smart home
- Using Google Assistant to control smart security systems
⚠️ Common Mistakes to Avoid When Installing a Smart Alarm System
Even though modern smart alarm systems are made for easy installation, a few small missteps can lead to big headaches — like missed alerts, false alarms, or offline devices. Let’s go over the most common mistakes people make when setting up their own smart home security, and how to avoid them.
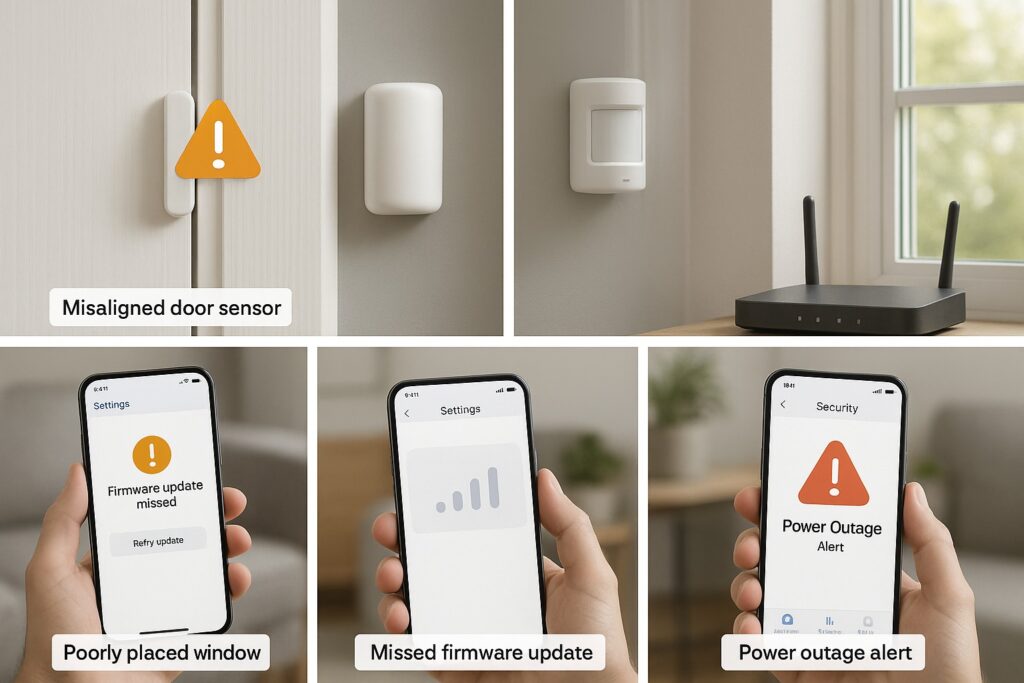
🚫 Mistake #1: Poor Sensor Placement
This is by far the most common issue. If motion detectors are placed too close to windows, vents, or direct sunlight, they may trigger false alerts. Likewise, door/window sensors that aren’t aligned properly may not detect openings or closings.
How to avoid it:
- Keep motion detectors away from heat sources or moving drapes
- Follow the line of sight rule: place sensors where they have a clear, unobstructed view
- Make sure entry sensors are aligned tightly — within ½ inch — for accurate detection
- Test each sensor as you install it
💤 Mistake #2: Skipping the System Test
Many people finish installing their devices and assume everything works — but without testing, you might not realize a sensor is disconnected or misconfigured.
How to avoid it:
- Run a full system test right after setup
- Walk through each room to check that all alerts and sensors trigger correctly
- Open and close each door or window to confirm real-time notifications
- Test the siren and make sure it activates properly
📶 Mistake #3: Weak Wi-Fi Signal
Your smart alarm system needs a strong, stable Wi-Fi connection to work reliably. If your hub is placed too far from the router or in a dead zone, devices may go offline or lag behind in sending alerts.
How to avoid it:
- Place your smart hub in a central location, close to your Wi-Fi router
- Use a Wi-Fi range extender or mesh system for larger homes
- Avoid placing hubs in enclosed spaces or behind thick walls
🔁 Mistake #4: Ignoring Firmware and App Updates
Just like any smart device, your alarm system software needs to be up to date. Skipping updates can lead to bugs, compatibility issues, and even security vulnerabilities.
How to avoid it:
- Turn on automatic updates if your system supports it
- Manually check for firmware or app updates at least once a month
- Keep your mobile app updated to access the latest features and stability fixes
🔌 Mistake #5: No Backup Plan
What happens if your power or internet goes out? If your system has no backup battery or cellular fallback, it may leave your home unprotected during outages.
How to avoid it:
- Choose a system with built-in battery backup
- If available, activate cellular backup monitoring for continuous protection
- Keep spare batteries for motion detectors and door sensors
More about Wi-Fi strength and hub placement:
- How to improve Wi-Fi for smart devices
- Best Wi-Fi mesh systems for smart homes
👷♂️ When to Call a Professional (And When You Don’t Need To)
Most modern smart alarm systems are designed for DIY installation, and for many homeowners, that’s more than enough. But sometimes, depending on your home’s layout or your specific security needs, it might be smarter to call in a professional.
Let’s break down when you can handle it yourself — and when you’re better off letting the experts take over.
✅ When You Don’t Need a Pro
If you’re setting up a wireless smart alarm system in a standard apartment or single-family home, and you’re comfortable using a smartphone app, you’re good to go. Most DIY alarm kits like Ring, SimpliSafe, or Wyze come with plug-and-play hardware and app-guided instructions that make setup super simple.
Choose DIY if:
- Your home has a straightforward layout
- You’re installing basic sensors, a hub, and a mobile app
- You want to save money on installation fees
- You prefer full control over your system without contracts
- You’re okay with self-monitoring or optional low-cost subscriptions
DIY smart alarm systems are built for people who like to take control, learn a little, and get the satisfaction of securing their home with their own two hands.
🚧 When You Should Consider a Professional
Not all homes — or needs — are the same. If your setup is more complex, a pro can save you time, avoid costly mistakes, and ensure everything is connected correctly.
Call a professional if:
- You live in a large, multi-story home or a home with complicated architecture
- You need to install a wired alarm system (not just wireless)
- You’re integrating with advanced smart home platforms (Z-Wave, Zigbee, IFTTT chains)
- You require 24/7 professional monitoring with compliance permits
- You’re connecting security cameras, smoke detectors, or existing hardwired sensors
- You want guaranteed troubleshooting and post-installation support
In these cases, hiring a licensed security technician might actually save you more time, frustration, and effort in the long run.
💡 Bonus Tip: You can still do the basic setup yourself, and call a pro only for the trickier parts — like camera wiring, integrating legacy systems, or configuring advanced routines.
🏆 Best 4 DIY Smart Alarm Systems in 2025 (Mini Comparison)
With so many options out there, choosing the right DIY smart alarm system can be overwhelming — especially when they all promise security, simplicity, and smart features. That’s why we’ve narrowed it down to the top-rated systems in 2025 that are perfect for homeowners who want reliable protection without the hassle of professional installation.
Here’s a quick look at the best options, along with what makes each one stand out.
🔍 1. Ring Alarm (2nd Gen)
Why it’s great:
Ring offers one of the most user-friendly setups on the market. It’s easy to install, has solid mobile app control, and integrates seamlessly with Alexa. You can add Ring cameras, video doorbells, and even a solar-powered yard sign for extra deterrence.
- Price Range: $$
- Monitoring: Optional paid plan ($10/mo)
- Best For: Beginners who want a trusted brand with great expandability
- Pros: Affordable, great app, easy to expand
- Cons: No native Google Home or Apple HomeKit support
🔍 2. SimpliSafe Essentials Kit
Why it’s great:
SimpliSafe is known for professional-grade protection with DIY simplicity. It offers optional 24/7 monitoring, sleek hardware, and solid battery backup — perfect for homeowners who want a bit more peace of mind.
- Price Range: $$$
- Monitoring: Optional pro monitoring ($20–$30/mo)
- Best For: Homeowners looking for more serious protection without contracts
- Pros: Great design, reliable alerts, long battery life
- Cons: Slightly higher price point
🔍 3. Wyze Home Monitoring System
Why it’s great:
If you’re on a budget but still want smart features, Wyze is the best bang for your buck. It’s incredibly affordable, easy to install, and includes access to the Wyze app for alerts, sensor status, and emergency dispatch (with plan).
- Price Range: $
- Monitoring: Optional ($10/mo with Noonlight)
- Best For: Renters and first-time DIYers
- Pros: Cheap, super simple to set up, compact sensors
- Cons: Limited smart assistant integration, fewer advanced features
🔍 4. Abode iota All-in-One Security Kit
Why it’s great:
Abode is the most flexible and automation-friendly system in this group. It works with Alexa, Google Assistant, and Apple HomeKit, plus supports Z-Wave and Zigbee for true smart home enthusiasts.
- Price Range: $$$
- Monitoring: Optional self or pro plans
- Best For: Tech-savvy users or those using HomeKit
- Pros: Built-in camera in base station, great integrations
- Cons: Slightly more complex setup
You will also like:
- Best smart alarm systems in 2025
- Comparison of top-rated smart security kits
- Ring Alarm vs SimpliSafe vs Wyze
📊 Quick Comparison Table
| Brand | Price | Monitoring | App Support | Smart Integration | Setup Difficulty | Best For |
|---|---|---|---|---|---|---|
| Ring Alarm | $$ | Optional | Excellent | Alexa only | Very Easy | Beginners & Alexa users |
| SimpliSafe | $$$ | Optional + Pro | Excellent | Alexa / Google | Easy | Homeowners wanting reliability |
| Wyze Security | $ | Optional | Good | Alexa / Google (limited) | Very Easy | Budget-conscious renters |
| Abode iota | $$$ | Optional | Excellent | Alexa / Google / HomeKit | Moderate | Smart home automation lovers |
🧠 Final Thoughts:
If you’re just starting out and want quick and easy protection, go for Ring or Wyze. If you’re ready for something more advanced with stronger monitoring features, SimpliSafe is a solid middle ground. And if you’re building a full smart home ecosystem, Abode iota gives you the most flexibility.
✅ Conclusion: You’re Now the Security Pro of Your Own Home
You don’t need to be a tech expert or hire a costly installer to protect your home anymore. With today’s smart alarm systems, you’ve got the power to set up a full, reliable home security system all on your own — using just your smartphone and a little guidance.
By choosing the right system, placing your sensors carefully, connecting everything through the mobile app, and running regular tests, you’ve now built a DIY wireless security system that’s smart, effective, and completely tailored to your home.
Whether you’re securing a small apartment, a family home, or something in between — you’ve taken a big step toward keeping your loved ones and property safe. And the best part? You did it all yourself, without a single service fee.
🛡️ Your smart home is now your smart fortress.

Frequently Asked Questions (FAQ)
Yes, absolutely. Most smart alarm kits today are designed for DIY installation and come with clear, step-by-step instructions. You don’t need special tools or technical skills — just follow the app setup, mount the sensors, and you’re good to go.
In most cases, no. Modern smart alarms are wireless and use adhesive strips, so you won’t need a drill or screws. However, having a screwdriver or level on hand can help if you want a more permanent install.
Ring Alarm and Wyze Home Monitoring are considered the easiest to set up. They offer pre-paired devices, clear app guidance, and intuitive mobile control, making them perfect for first-time users.
Yes, you can. Many smart alarms like Ring, Abode, and Wyze allow self-monitoring, where you receive alerts and manage your security through the app — no monthly fees required. Pro monitoring is optional.
Yes. Most smart alarm systems rely on a stable Wi-Fi connection for sending alerts, syncing devices, and remote control via smartphone. Some advanced systems also offer cellular backup for emergencies.
Typically under an hour. Most wireless DIY smart alarm kits can be fully installed in 30 to 60 minutes, depending on how many sensors you have. The mobile app walks you through each step.